Hostname: page-component-745bb68f8f-s22k5 Total loading time: 0 Render date: 2025-01-10T14:47:48.570Z Has data issue: false hasContentIssue false

Determination of the true projected contact area by in situ indentation testing

Published online by Cambridge University Press:  30 August 2019

Gaylord Guillonneau*
Affiliation:
Laboratory for Mechanics of Materials and Nanostructures, Empa, Swiss Federal Laboratories for Materials Testing and Research, Thun CH-3602, Switzerland; and Ecole Centrale de Lyon, Laboratoire de Tribologie et Dynamique des Systèmes, Université de Lyon, 69134 Ecully Cedex, France
Jeffrey M. Wheeler
Affiliation:
Laboratory for Mechanics of Materials and Nanostructures, Empa, Swiss Federal Laboratories for Materials Testing and Research, Thun CH-3602, Switzerland; and Laboratory for Nanometallurgy, Department of Materials Science, ETH Zürich, Zürich CH-8093, Switzerland
Juri Wehrs
Affiliation:
Laboratory for Mechanics of Materials and Nanostructures, Empa, Swiss Federal Laboratories for Materials Testing and Research, Thun CH-3602, Switzerland
Laetitia Philippe
Affiliation:
Laboratory for Mechanics of Materials and Nanostructures, Empa, Swiss Federal Laboratories for Materials Testing and Research, Thun CH-3602, Switzerland
Paul Baral
Affiliation:
Ecole Centrale de Lyon, Laboratoire de Tribologie et Dynamique des Systèmes, Université de Lyon, 69134 Ecully Cedex, France
Heinz Werner Höppel
Affiliation:
Friedrich-Alexander-Universität Erlangen-Nürnberg, Department of Materials Science and Engineering, Institute I: General Materials Properties WWI, 91058 Erlangen, Germany
Mathias Göken
Affiliation:
Friedrich-Alexander-Universität Erlangen-Nürnberg, Department of Materials Science and Engineering, Institute I: General Materials Properties WWI, 91058 Erlangen, Germany
Johann Michler
Affiliation:
Laboratory for Mechanics of Materials and Nanostructures, Empa, Swiss Federal Laboratories for Materials Testing and Research, Thun CH-3602, Switzerland
*
a)Address all correspondence to this author. e-mail: [email protected]
Get access

Abstract

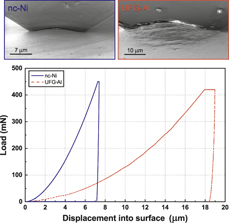
A major limitation in nanoindentation analysis techniques is the inability to accurately quantify pile-up/sink-in around indentations. In this work, the contact area during indentation is determined simultaneously using both contact mechanical models and direct in situ observation in the scanning electron microscope. The pile-up around indentations in materials with low H/E ratios (nanocrystalline nickel and ultrafine-grained aluminum) and the sink-in around a material with a high H/E ratio (fused silica) were quantified and compared to existing indentation analyses. The in situ projected contact area measured by Scanning Electron Microscopy using a cube-corner tip differs significantly from the classical models for materials with low H/E modulus ratio. Using a Berkovich tip, the in situ contact area is in good agreement with the contact model suggested by Loubet et al. for materials with low H/E ratio and in good agreement with the Oliver and Pharr model for materials with high H/E ratio.

Type
Article
Copyright
Copyright © Materials Research Society 2019 

Access options

Get access to the full version of this content by using one of the access options below. (Log in options will check for institutional or personal access. Content may require purchase if you do not have access.)

Footnotes

*This article has been corrected since its original publication. An erratum notice detailing these changes was also published (doi: 10.1557/jmr.2019.310).

References

Tabor, D.: The Hardness of Metals (Oxford University Press, Oxford, 2000).Google Scholar
Fischer-Cripps, A.C.: Nanoindentation (Springer-Verlag, New York, 2002).CrossRefGoogle Scholar
Tabor, D.: The hardness of solids. Rev. Phys. Technol. 1, 145 (1970).CrossRefGoogle Scholar
Oliver, W.C. and Pharr, G.M.: An improved technique for determining hardness and elastic-modulus using load and displacement sensing indentation experiments. J. Mater. Res. 7, 1564 (1992).CrossRefGoogle Scholar
Bulychev, S.I., Alekhin, V.P., Shorshorov, M.K., Ternovskii, A.P., and Shnyrev, G.D.: Determining Young modulus from the indenter penetration diagram. Ind. Lab. USSR Engl. Transl. Zavod. Lab. 41, 1409 (1975).Google Scholar
Pharr, G.M., Oliver, W.C., and Brotzen, F.R.: On the generality of the relationship among contact stiffness, contact area, and elastic modulus during indentation. J. Mater. Res. 7, 613 (1992).CrossRefGoogle Scholar
Sneddon, I.N.: The relation between load and penetration in the axisymmetric boussinesq problem for a punch of arbitrary profile. Int. J. Eng. Sci. 3, 47 (1965).CrossRefGoogle Scholar
King, R.B.: Elastic analysis of some punch problems for a layered medium. Int. J. Solids Struct. 23, 1657 (1987).CrossRefGoogle Scholar
Oliver, W.C. and Pharr, G.M.: Measurement of hardness and elastic modulus by instrumented indentation: Advances in understanding and refinements to methodology. J. Mater. Res. 19, 3 (2004).CrossRefGoogle Scholar
Loubet, J.L., Georges, J.M., and Meille, G.: In Microindentation Techniques in Materials Science and Engineering, American Society for Testing Materials, Blau, P.J and Lawn, B., eds. (Philadelphia, 1986); pp. 7289.Google Scholar
Asif, S.A.S., Wahl, K.J., and Colton, R.J.: Nanoindentation and contact stiffness measurement using force modulation with a capacitive load-displacement transducer. Rev. Sci. Instrum. 70, 2408 (1999).CrossRefGoogle Scholar
Bolshakov, A., Oliver, W.C., and Pharr, G.M.: Finite element studies of the influence of pile-up on the analysis of nanoindentation data. MRS Proc. 436, 141 (1996).CrossRefGoogle Scholar
Bolshakov, A. and Pharr, G.M.: Influences of pileup on the measurement of mechanical properties by load and depth sensing indentation techniques. J. Mater. Res. 13, 1049 (1998).CrossRefGoogle Scholar
Loubet, J.L., Bauer, M., Tonck, A., Bec, S., and Gauthier-Manuel, B.: NATO Adv. Study Inst. Ser., Ser. E 429 (1993).Google Scholar
Hochstetter, G., Jimenez, A., and Loubet, J.L.: Strain-rate effects on hardness of glassy polymers in the nanoscale range. Comparison between quasi-static and continuous stiffness measurements. J. Macromol. Sci., Part B: Phys. 38, 681 (1999).CrossRefGoogle Scholar
Guillonneau, G.: Nouvelles Techniques de Nano-Indentation Pour Des Conditions Expérimentales Difficiles: Très Faibles Enfoncements, Surfaces Rugueuses, Température (Ecully, Ecole centrale de Lyon, France, 2012).Google Scholar
Bec, S., Tonck, A., Georges, J-M., Georges, E., and Loubet, J-L.: Improvements in the indentation method with a surface force apparatus. Philos. Mag. A 74, 1061 (1996).CrossRefGoogle Scholar
Stilwell, N.A. and Tabor, D.: Elastic recovery of conical indentations. Proc. Phys. Soc. 78, 169 (1961).CrossRefGoogle Scholar
Tuck, J.R., Korsunsky, A.M., Bull, S.J., and Davidson, R.I.: On the application of the work-of-indentation approach to depth-sensing indentation experiments in coated systems. Surf. Coat. Technol. 137, 217 (2001).CrossRefGoogle Scholar
Cabibbo, M. and Ricci, P.: True hardness evaluation of bulk metallic materials in the presence of pile up: Analytical and enhanced lobes method approaches. Metall. Mater. Trans. A 44, 531 (2013).CrossRefGoogle Scholar
McElhaney, K.W., Vlassak, J.J., and Nix, W.D.: Determination of indenter tip geometry and indentation contact area for depth-sensing indentation experiments. J. Mater. Res. 13, 1300 (1998).CrossRefGoogle Scholar
Charleux, L., Keryvin, V., Nivard, M., Guin, J-P., Sanglebœuf, J-C., and Yokoyama, Y.: A method for measuring the contact area in instrumented indentation testing by tip scanning probe microscopy imaging. Acta Mater. 70, 249 (2014).CrossRefGoogle Scholar
Howell, J.A., Hellmann, J.R., and Muhlstein, C.L.: Correlations between free volume and pile-up behavior in nanoindentation reference glasses. Mater. Lett. 62, 2140 (2008).CrossRefGoogle Scholar
Kempf, M., Göken, M., and Vehoff, H.: The mechanical properties of different lamellae and domains in PST-TiAl investigated with nanoindentations and atomic force microscopy. Mater. Sci. Eng., A 329–331, 184 (2002).CrossRefGoogle Scholar
Volz, T., Schwaiger, R., Wang, J., and Weygand, S.M.: In International Conference on Mechanical Engineering Research ICMER2017 (Iop Publishing Ltd., Bristol, 2017); p. UNSP 012013.Google Scholar
Göken, M., Sakidja, R., Nix, W.D., and Perepezko, J.H.: Microstructural mechanical properties and yield point effects in Mo alloys. Mater. Sci. Eng., A 319–321, 902 (2001).CrossRefGoogle Scholar
ur Rehman, H., Durst, K., Neumeier, S., Parsa, A.B., Kostka, A., Eggeler, G., and Göken, M.: Nanoindentation studies of the mechanical properties of the μ phase in a creep deformed Re containing nickel-based superalloy. Mater. Sci. Eng., A 634, 202 (2015).CrossRefGoogle Scholar
Rabe, R., Breguet, J-M., Schwaller, P., Stauss, S., Haug, F-J., Patscheider, J., and Michler, J.: Observation of fracture and plastic deformation during indentation and scratching inside the scanning electron microscope. Thin Solid Films 469–470, 206 (2004).CrossRefGoogle Scholar
Moser, B., Kuebler, J., Meinhard, H., Muster, W., and Michler, J.: Observation of instabilities during plastic deformation by in situ SEM indentation experiments. Adv. Eng. Mater. 7, 388 (2005).CrossRefGoogle Scholar
Moser, B., Löffler, J.F., and Michler, J.: Discrete deformation in amorphous metals: An in situ SEM indentation study. Philos. Mag. 86, 5715 (2006).CrossRefGoogle Scholar
Maschmann, M.R., Zhang, Q., Wheeler, R., Du, F., Dai, L., and Baur, J.: In situ SEM observation of column-like and foam-like CNT array nanoindentation. ACS Appl. Mater. Interfaces 3, 648 (2011).CrossRefGoogle ScholarPubMed
Nili, H., Kalantar-zadeh, K., Bhaskaran, M., and Sriram, S.: In situ nanoindentation: Probing nanoscale multifunctionality. Prog. Mater. Sci. 58, 1 (2013).CrossRefGoogle Scholar
Legros, M., Gianola, D.S., and Motz, C.: Quantitative in situ mechanical testing in electron microscopes. MRS Bull. 35, 354 (2010).CrossRefGoogle Scholar
May, J., Höppel, H.W., and Göken, M.: Strain rate sensitivity of ultrafine-grained aluminium processed by severe plastic deformation. Scr. Mater. 53, 189 (2005).CrossRefGoogle Scholar
Saile, V.: In LIGA and Its Applications, Saile, V., Wallrabe, U., Tabata, O. and Korvink, J.G., eds. (Wiley-VCH Verlag GmbH & Co. KGaA, Weinheim, Germany, 2008); pp. 110.CrossRefGoogle Scholar
Guillonneau, G., Kermouche, G., Bec, S., and Loubet, J-L.: Determination of mechanical properties by nanoindentation independently of indentation depth measurement. J. Mater. Res. 27, 2551 (2012).CrossRefGoogle Scholar
Weihs, T.P. and Pethica, J.B.: Monitoring time-dependent deformation in small volumes. MRS Online Proc. Libr. Arch. 239, 325330 (1991).CrossRefGoogle Scholar
Spence, D.A.: The hertz contact problem with finite friction. J. Elast. 5, 297 (1975).CrossRefGoogle Scholar
Bucaille, J.L., Stauss, S., Felder, E., and Michler, J.: Determination of plastic properties of metals by instrumented indentation using different sharp indenters. Acta Mater. 51, 1663 (2003).CrossRefGoogle Scholar
Grunzweig, J., Longman, I.M., and Petch, N.J.: Calculations and measurements on wedge-indentation. J. Mech. Phys. Solids 2, 81 (1954).CrossRefGoogle Scholar
Chitkara, N.R. and Butt, M.A.: Numerical construction of axisymmetric slip-line fields for indentation of thick blocks by rigid conical indenters and friction at the tool-metal interface. Int. J. Mech. Sci. 34, 849 (1992).CrossRefGoogle Scholar
Maier, V., Durst, K., Mueller, J., Backes, B., Höppel, H.W., and Göken, M.: Nanoindentation strain-rate jump tests for determining the local strain-rate sensitivity in nanocrystalline Ni and ultrafine-grained Al. J. Mater. Res. 26, 1421 (2011).CrossRefGoogle Scholar
Supplementary material: File

Guillonneau et al. supplementary material

Guillonneau et al. supplementary material

Download Guillonneau et al. supplementary material(File)
File 550 KB