
Overview
Demonstrating changes at the cellular level via morphology is the current gold standard in diagnostic histopathology. Most pertinent to tumour pathology, cells expressing observable antigenic proteins provide valuable information as to their lineage, disease status and operational conditions. Detecting these ‘expressions’ and evaluating them within a clinical context gives confidence to the clinician considering relevant therapies. Likewise, interpreting disease pathways and simulating models helps researchers address relevant hypotheses (Reference De Matos, Trufelli, de Matos and da Silva Pinhalde Matos et al. 2010).
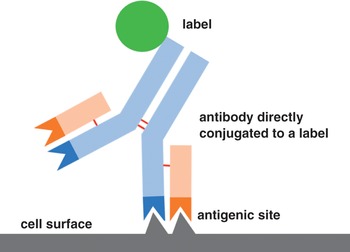
Immunohistochemistry (IHC) is a technology employed to ‘tag’ specific sites within tissue and observe the reaction. The ability to do so renders IHC, a powerful tool in diagnostics and research applications. The discipline is made up of three elements: immunology, histology and chemistry. Employing antibodies to identify antigenic sites within tissue utilizes concepts from immunology. Establishing the technique upon the study of cells and tissues explains the histology reference. Principles of chemistry are used to visualize the reaction detected from a ‘label’ bound directly or indirectly to the antibodies, an idea explored further in what follows.
Immunohistochemistry originated in 1890 with the discovery of serum antibodies and their use to combat disease (Reference Childs, McManus and MitchellChilds 2014). This chapter begins with a homage to the pioneering work of early investigators and their valuable contributions throughout the years. A revolution of imagination, ingenuity and curiosity from scientists and clinicians worldwide, buoyed by their successes in research but also undeterred by their failures, led to discoveries still impacting disease diagnoses and treatments today. This chapter endeavours to highlight individual contributors to this progressing technology.
Although IHC is built from a solid theoretical basis centred upon the antigen–antibody attraction, setbacks and uncertainties often arise within IHC practice. A basic rundown of IHC principles is offered and includes the relationship of the antigen and antibody complex within IHC assays. Variations adopted from the ‘standard’ IHC protocol are then explored and compared to current standard practices. Common terms such as ‘immunocytochemistry’, ‘immunolabelling’, ‘immunofluorescence’ and ‘immunoperoxidase staining’ are delved into. All share the same principles with IHC but can be differentiated with subtle modifications to the technique. A discussion as to the differences is provided in this chapter whilst the highlighting of important phrases and explanations gives context to the technique. A brief mention of manual techniques and automation systems along with specific examples of using IHC in real practice should serve as a good introduction to the discipline as well as to the book. By this chapter’s end, it should be evident how IHC has come to be regarded as the diagnostic tool of choice in anatomical pathology.
Laying the Foundations
From IHC’s humble beginnings to the present day, the story of IHC is one to be celebrated and disseminated. It is an account of a collective effort from inquisitive minds whose discoveries contributed not only to the development of IHC, but also to the impact it has made on disease investigation and drug development. The effects have been so huge that possibilities from this technology continue to be redefined. Most will attest that IHC has been a ‘game changer’ in diagnostic histopathology.
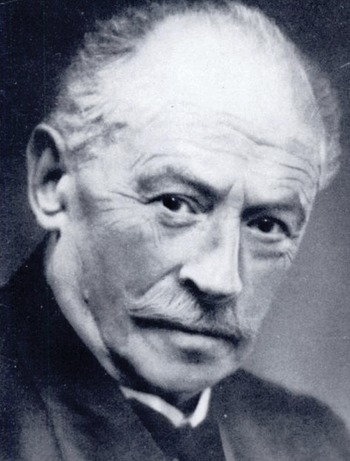
Seeking treatment for diphtheria in the 1890s, researchers made a pivotal discovery in the form of serum therapy which can be viewed as one of the foundations of IHC. To combat the 50,000 German fatalities from the disease each year, three eminent scientists collaborated on researching how to effectively treat patients with what we now know is a toxin originating from a bacterial infection. Dr Emil von Behring (Figure 1.1) at the Pharmacological Institute, University of Bonn, in association with Robert Koch and his colleague Shibasaburo Kitasato, found that rabbits, guinea pigs, rats and horses injected with attenuated forms of Corynebacterium diphtheriae produced ‘antitoxins’ (antibodies) in their sera that could then be used to treat patients. In 1891, the mortality rate from the disease reduced from more than 50% to 13%, a drop so important that in 1901, Dr von Behring received the first Nobel Prize in Physiology or Medicine for this important breakthrough and was instilled as the founder of serum therapy.

Figure 1.1 Dr Emil von Behring
Although successful, this ‘passive’ serum treatment prevented diphtheria for only a short time. In 1901, while searching for a treatment that worked longer, Dr von Behring injected patients directly with attenuated bacteria or with mixtures of antiserum and attenuated bacteria so that patients produced their own antibodies. This discovery led to the first ‘active’ immunization strategy.
In 1891, a tetanus serum was introduced as a therapeutic agent against tetanus in animals valuable to agriculture. At the onset of the First World War, as many lives were lost not from the battlefield but from tetanus, the serum was injected into soldiers. For preventing the disease during battle and saving many lives, Dr von Behring was awarded the Prussian Iron Cross Medal as a ‘Saviour of German Soldiers’ (NobelPrize.org).
These two occasions directed investigators to the wonders of antibodies. Although antibodies were still mysterious in the early 1900s, researchers already knew their value in medicine. To define them and to establish a standard by which they could be measured, Dr von Behring worked with Professor Paul Ehrlich (Figure 1.2) at Robert Koch’s Institute in collecting serum from large animals and working on the serum therapy protocol. By 1913, Dr von Behring had produced his first active vaccine. Having attenuated both diphtheria antigen and antibody (mixing both active and passive therapy), the vaccine was aimed at both long-term protection against and short-term neutralization of the bacteria (Reference Childs, McManus and MitchellChilds 2014).

Figure 1.2 Professor Paul Ehrlich
Professor Paul Ehrlich was a pioneer in pathology renowned for his contributions in the fields of histochemistry, haematology and microbiology. Notable works include the theory and practice of staining animal tissues with aniline dyes, his research categorizing dyes into basic, acidic or neutral groups, and the classification of blood cell granules. In histology, Ehrlich is synonymous with a specific preparation of a working haematoxylin formulation bearing his name.
In 1896, Professor Ehrlich was appointed director of the Institute for the Control of Therapeutic Sera. Researching the characteristics and mechanisms of the antigen–antibody reaction, he found that the infective agent comprised two groups, the toxic region and the toxoid. The latter in his view was the group responsible for fuelling the production of antibodies. He noticed that heat enhanced the antigen–antibody reaction while cold restricted it, and that the binding was specific but could be broken with hydrochloric acid. For this groundbreaking work, Professor Ehrlich was awarded the Nobel Prize in Physiology or Medicine in 1908.
Basic Principles of Immunohistochemistry
The overall aim of IHC is to detect the presence, distribution and location of specific molecules (antigens) in cells and tissue. To make this possible, the three main concepts of immunology, histology and chemistry are required. Immunohistochemistry first employs antibodies to identify antigens and second affords the ability to visualize the reaction. Although less sensitive than Western blots or enzyme-linked immunosorbent assays (ELISA), IHC has the main advantage of enabling the investigator to observe and understand disease processes in a morphological context within an intact tissue environment.
Immunology Concepts
Antibodies, otherwise known as immunoglobulins, are serum proteins produced by B-cell lymphocytes that play an important role in an animal’s defence system. They have the ability to bind with specific antigens that the body sees as foreign, thus initiating an immune response. The term ‘antigen’ is coined from two words: ‘antibody’ and ‘generator’ (Reference Male, Roitt, Roitt, Brostoff and MaleMale and Roitt 1998). More precisely, it is the epitope on the antigen that the antibody recognizes. Multiple epitopes can be found in one antigen molecule.
Figure 1.3 represents an antibody with two light chains and two heavy chains arranged in a ‘Y’ shape. The light chain is connected to the heavy chain via a sulphide bond and the two heavy chains are joined together by a disulphide bridge. Note the distinct areas of the Fab and Fc regions. The binding site is at the Fab location and this is where the antibody latches onto the epitope. It is also called the variable region because this Fab site adapts to all of the variations an epitope can present to the animal. The Fc region belongs to a cascade of events that ultimately recruits phagocytes to destroy the pathogen. This body of knowledge came from the combined effort of astute workers, some of whom are now highlighted.

Figure 1.3 Schematic of an antibody
In 1897 at Vienna’s Serotherapeutic Institute, Dr Rudolf Kraus demonstrated a method to detect antigen–antibody complexes. His precipitin reaction resulted from incubations of serum containing anti-cholera antibodies obtained from rabbits with soluble Vibrio cholerae bacterial infiltrates. He proved it again with serum containing anti-typhoid antibodies with Salmonella enterica serotype Typhi bacterial infiltrates. Each incubation resulted in the production of insoluble clumps of antigen–antibody complexes.
The precipitation reaction was of great interest to researchers, but it wasn’t until 1920 that the next significant breakthrough was made. Figure 1.4 shows Dr Michael Heidelberger, a person highly regarded as one of the fathers of immunology and the founder of modern immunochemistry, a branch of biochemistry that examines the mammalian immune system on a molecular level. He established the first coloured antigen–antibody complex. Under the tutelage of Dr Oswald Avery, himself a notable figure in early DNA research, Dr Heidelberger identified the protein nature of antibodies and noted that the antigens he was working with were polysaccharides (Reference Van EppsVan Epps 2006). Further discoveries revealed antibody origin, function and specificity. These revelations assisted in understanding immune reaction chemistry and molecular mechanisms, which then led to more effective antisera for the treatment and prevention of bacterial infections.

Figure 1.4 Dr Michael Heidelberger.
Throughout his career, Dr Heidelberger received many awards in recognition for his work. He received 15 honorary degrees, 46 medals and 2 Albert Lasker awards in 1953 and 1978. For his work in developing quantitative analyses of antibodies, he was decorated with the Louis Pasteur Gold Medal in 1960. This prestigious honour is given by the Swedish Medical Society once every 10 years. Dr Heidelberger’s other significant prizes include the Bronze Medal of the City of Paris (1964), the National Medal of Science (1967) and the Louisa Gross Horwitz Prize in 1977 (Reference StaceyStacey, 1994).
In the 1930s, Professor John Richardson Marrack was another researcher intrigued by the antigen–antibody complex and its crystal lattice-like formation. He believed the antibody as well as the antigen had more than one binding site and that the precipitating complex formed was the result of an antibody bridging with two multivalent antigen molecules. Working with diphtheria, he showed the toxin–antitoxin precipitate was made up of mostly antitoxin and this compound consisted of serum globulin. In 1934, Professor Marrack succeeded in attaching a dye to antibodies and through quantitative tests showed that for optimal precipitation, concentrations of antigen and antibody needed to be ideal. Researchers still adhere to this practice today when diluting out concentrates for IHC assays. In 1938, he wrote a book about antigens and antibodies, explaining the relationship between specificity and chemical structure and highlighting his thoughts on the nature of the antigen–antibody complex. In 1971, for pioneering work in the chemical interpretation of antigen–antibody interactions, Professor Marrack received the Distinguished Service Award of the First International Congress of Immunology (Complete Dictionary of Scientific Biography).
The works concerning antibodies and antigens from these early pioneers at the dawn of the twentieth century laid the groundwork for the continued evolution of IHC. The next leap was to bring the technology in vivo and observe the antigen–antibody reaction from a morphological viewpoint.
Histology Notions
When a tissue sample is analysed for disease, the first step is gross (macroscopic) examination noting structures and changes to the tissue that are large enough to be visible to the naked eye. Areas of particular interest are sampled and placed into histology cassettes for processing. Routinely, the submitted tissue pieces must be no larger than 25 mm long x 20 mm wide x 4 mm thick. Samples at this size will fix and process optimally on a routine overnight schedule. For formalin fixed paraffin embedded (FFPE) blocks, tissue fixation and processing are fundamentally the most important factors for IHC success. Figure 1.5 shows a section of liver sampled at the macroscopic ‘cut-up’ to visualize the lesion within the organ. A complete description and measurements are recorded before further dissection into cassettes. The main objectives in this clinical situation are finding answers to questions such as:
What is the nature of this lesion?
The description of the morphological features observed under the microscope
Is this tumour a primary liver cancer or a metastatic deposit from somewhere else in the body?
Are margins involved? Is there evidence of local spread or metastasis to distant sites?
What are the prognostic implications for the patient?
Are specific therapies suitable for this type of cancer?

Figure 1.5 Gross macroscopic ‘cut-up’ is the foundation of anatomical pathology
A series of histological procedures ensues: tissue dehydration and clearing before paraffin wax infiltration, block embedding before microtomy and mounting onto glass slides. Sections are stained for haematoxylin and eosin (H&E), providing the first glimpse of morphology under microscopy. The H&E, using the basic haematoxylin dye to stain nuclear components blue, and eosin, an acidic dye, to stain cytoplasmic components pink, is the gold standard morphology stain in histopathology. A rather simple stain to perform, it highlights significant features of the tissue that if left unstained would be invisible. The subtle hues of the H&E stain allow the trained pathologist to microscopically assess tissue structure and morphology.
Not all structures, however, are demonstrated by the H&E stain. Some structures require the use of special stains to identify and reveal them. As shown in Figure 1.6A, reticulin fibres require silver impregnation to highlight the black type III collagen within organs of the reticuloendothelial system such as the liver. A trichrome stain developed by Dr Pierre Masson is seen in Figure 1.6B. This technique uses a selection of dyes to differentiate muscle from collagen fibres in connective tissue (blue). Other tissue entities such as fibrin and erythrocytes are also identifiable in trichrome stains. Note also the magnification given for Figure 1.6 is ‘x40’. This indicates the objective lens on the microscope used to capture the image is rated at x40. The magnification in real terms is achieved by multiplying the objective lens magnification by the eyepiece magnification. For all images used in this chapter and throughout the book, the eyepiece objective is always x10. Therefore the ‘real’ magnification of images shown in Figure 1.6 is 400x (40 x 10).

Figure 1.6 Reticulin techniques (A) and trichrome methods (B) are common histology special stains
The main objective of performing H&E and special stains on tissue sections mounted onto glass slides is to enable the pathologist to observe the morphological picture via microscopy and relate the findings back to the clinical history. A comprehensive illustration of the pathological processes occurring within the tissue specimen is the ultimate aim. Often, details are seen which are not easily recognized or understood. This is because many diseases mimic each other with similar cellular structures but actually differ in their behaviour and how they are treated. Where accurate diagnoses are concerned, knowing the differences and interpreting them precisely is vital. Immunohistochemistry adds value to this endeavour. It is applied in both diagnostic anatomical pathology and research applications to assist with:
diagnosis of disease and determining whether a tumour is benign or malignant
identification of cell type and lineage to histologic origin and primary site of tumours
identification of prognostic factors and therapeutic indications of some diseases
identification of structures, organisms and materials secreted by cells
diagnosis of morphologically non-differentiated neoplasms
subtyping of neoplasia (such as lymphomas)
Combining immunology concepts to a morphological context is only possible if the investigator can see the reaction. To fulfil this criteria, IHC practice is grounded in the science of chemistry. Without it, microscopic examinations would not be possible.
Chemistry Influences
Performed on tissue sections that are either freshly frozen or FFPE, IHC detects various entities within tissue via a label attached directly or indirectly to an antibody, hence the often-used nomenclature of ‘immunolabelling’. The nature of this label dictates the chemistry required to develop and observe the antigen–antibody reaction. The advantage is the spatial information offered, the specific locale within the tissue specimen that is tagged for evaluation via light, electron or fluorescence microscopy. The label can be a fluorophore, chromogenic dye, metal element or radioisotope with each requiring specific protocol development. The science behind two of the most commonly used labels in IHC standard practice is now explored further.
Visualization via Fluorescence
Fluorescence is a phenomenon whereby light at a certain energy (wavelength) has the ability to excite certain compounds to such a degree that when absorbed, it will emit light at a longer wavelength. Naturally occurring substances displaying this marvel are called fluorophores. Dyes and chemicals added to materials to confer fluorescence are known as fluorochromes (Reference Bancroft, Floyd, Bancroft and GambleBancroft and Floyd 2008). Immunofluorescence (IF) employs fluorochromes as the label conjugated directly or indirectly to the antibody. However, a specialized microscope different to a conventional optical light set-up is required. Before discussing why this is so, it is pertinent to explore how IF originated.
In 1939, Dr Albert Hewett Coons at Harvard University was investigating the components of Aschoff nodules in rheumatic fever. He studied the nature of antigens and antibodies involved with their formation and wondered if it would be easier to localize the antigen by labelling the antibody molecule with something visible.
Working together with organic chemists Dr Louis Fieser, Dr Hugh Creech and Dr Norman Jones, he coupled anthracene isocyanate to anti-pneumococcal serum and succeeded in agglutinating the pneumococci. The bacteria fluoresced brightly under ultraviolet (UV) light, but this feat was hindered by unwanted background fluorescence seen in many other structures at the blue or red wavelengths. Dr Coons then switched the label to fluorescein isothiocyanate (FITC) to observe the characteristic apple green fluorescence. Visualization of the label was possible via a fluorescence microscope apparatus newly developed by an assistant professor, Allan Graffin, at Harvard’s Department of Anatomy. Dr Coon’s success with the basic fluorescein-labelling procedure paved the way for diagnostic fluorescence microscopy techniques in bacteriology, immunology and anatomical pathology. For his pivotal work with IF and the discovery that plasma cells make antibodies, Dr Coons received the Albert Lasker Basic Medical Research Award in 1959. He was also the recipient of numerous international honorary academic degrees and awards. These include the Paul Ehrlich Award in 1961, the Passano Award in 1962, the Gairdner Foundation International Award in 1962 and the Emil von Behring Prize in 1966 (American Association of Immunologists).
Fluorescence microscopy is different to conventional light microscopy. The ‘light source’ must have enough energy to excite the fluorochromes. Commonly, wavelengths in the UV spectrum produced by mercury vapour or xenon gas lamps are utilized. Nowadays, metal halide and light-emitting diode (LED) technology may also be employed to create the required wavelengths. This light is called the excitation wavelength because it is used to excite the fluorochrome. After absorbing the light at the excitation wavelength, the fluorochrome undergoes a change at the atomic level, resulting in a variation to the electron distribution pattern. Energy in the form of emitted radiation is released from the fluorochrome at a longer wavelength and therefore the fluorochrome possesses less energy. This change in energy state is referred to as ‘Stoke’s shift’. To observe these changes, special filters fitted to the microscope are required. Often termed ‘dichroic mirrors’, they are designed to transmit light at a certain wavelength to the fluorochrome whilst reflecting away other unwanted wavelengths. These mirrors are often called filter sets and they must be matched to the fluorochrome characteristics. For example, FITC has maximum excitation at 494 nm and emission spectra at 519 nm (Reference Horobin, Horobin and KiernanHorobin 2002). The dichroic mirror must allow light at wavelength 494 nm through to excite the fluorochrome and then permit light at 519 nm to reach the eyepieces. Notice the reason we see FITC as a green colour is because 519 nm is in the green zone of the visible light spectrum. The path of light after passing through the dichroic mirror to reach the fluorochrome is via the objective lens to excite the specimen and then back up the objective lens again to reach the eyepiece.
To summarize, let’s follow the light path. From the lamp source, light in the UV band passes through a dichroic mirror (filter), down through the objective lens and then on to the specimen containing the fluorochrome. It then travels back up the objective lens, through the dichroic mirror again on its way to the eyepiece for visualization. Hence the term ‘reflected light microscopy’ is often used to mean fluorescence microscopy. To get the most out of fluorescence microscopy, a darkroom is required and since fluorescence fades over time, it is common practice to take digital images for record-keeping. Although it is quite a sensitive marker, fluorescence does have advantages and disadvantages. Fortunately, investigators have other options and technologies with which to ‘label’ their antibodies.
Visualization via Enzymes
For more than 40 years, IF was considered a powerful diagnostic aid. However, the method clearly had faults. The most frustrating were the need for an expensive fluorescence microscope, the instability of fluorescein over time, autofluorescence in some tissues – especially with formaldehyde fixation – and the failures at the electron microscope (EM) level. Many attempts were made to counteract these issues; some workers used radioactive antibodies while others relied on heavy metals to tag antibodies. In 1966, it was Dr Richard Graham and Dr Morris Karnovsky’s studies of enzyme activity that paved the way for others to successfully attach enzymes and confer them as labels conjugated to antibodies.
The enzyme label is visualized by the enzyme’s involvement in the chemical reaction with a suitable chromogen inducing a visible coloured or election-dense precipitate with its substrate. The enzyme commonly used for IHC is horseradish peroxidase (HRP). As shown in Figure 1.7, in the presence of the substrate hydrogen peroxide (H2O2), HRP drives the oxidation of 3,3’-diaminobenzidine (DAB), resulting in an insoluble, photostable, brown-coloured precipitate at the antigen–antibody site. Addition of nickel, cobalt or copper salt renders the DAB precipitate different shades of brown through to black. Use of enzymes as the label to observe reactions with a conventional optical microscope proved popular. In addition to HRP, different enzymes can be used for different situations, depending on the desired colour for the end product. Other enzymes deployed include alkaline phosphatase, β-galactosidase and glucose oxidase.

Figure 1.7 The chemical reaction for diaminobenzidine (DAB) using horseradish peroxidase (HRP)
Horseradish Peroxidase
This enzyme has a molecular weight 40kDa glycoprotein that consists of 18% carbohydrate isolated from the root of the horseradish plant. Horseradish peroxidase has an iron haem group (haematin) as its active site which forms a complex with the substrate H2O2 and decomposing it to H2O and O2 when a H+ donor is available. Chromogens such as DAB are employed as H+ donors, resulting in an oxidization to form an insoluble brown product. Note the substrate for HRP is hydrogen peroxide (H2O2) and not to be confused with the chromogen DAB. Table 1.1 lists alternative chromogens suitable for HRP-based IHC.
| Hydrogen donors (chromogens) | Colour | Solvent |
|---|---|---|
| 3,3’-diaminobenzidine tetrahydrochloride (DAB) | brown | resistant |
| 3 amino-9-ethylcarbazole (AEC) | red | labile |
| 2-methyl-2 H-isothiazol-3-one | green | resistant |
| 4-chloro-1-Napthol | blue | labile |
| p-phenylene diamine dihydrochloride & pyrocatechol in 1:2 ratio (Hanker-Yates) | blue | resistant |
Alkaline Phosphatase
This enzyme, derived from calf intestinal alkaline phosphatase (AP), has a molecular weight of 100kDa. The histochemical reaction can be described as a simultaneous coupling or azo coupling whereby the enzyme removes and transfers phosphate groups from organic esters (substrate) by breaking the P-O bond. The esters are hydrolysed to phenolic compounds. The phenols then couple to diazo salts to produce the coloured end product as highlighted in Figure 1.8 using naphthol AS-MX phosphate as the substrate and Fast red as the diazo salt. The reaction product is a red insoluble precipitate but labile to alcohols. Mounting is possible in solvents such as DPX, but the dehydrating steps with alcohol should be avoided and replaced with oven drying.
Figure 1.8 The chemical reaction for Fast red using alkaline phosphatase
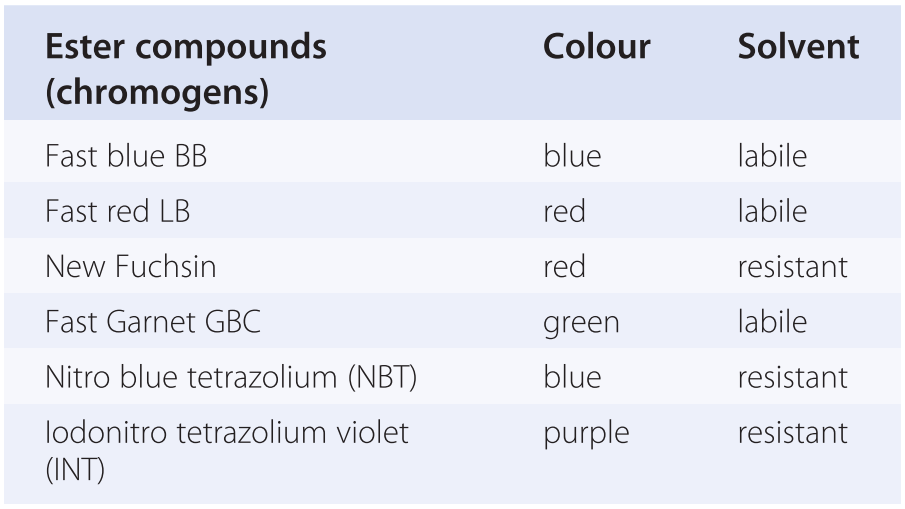
Other possible substrates include Naphthol AS-BI phosphate, Naphthol AS-TR phosphate and 5-bromo-4-chloro-3-indoxyl phosphate (BCIP). Table 1.2 lists alternative chromogens for AP.
Glucose Oxidase
This enzyme, derived from Aspergillus niger, has a molecular weight of 185kDA. Not commonly utilized when compared to HRP and AP, the enzyme facilitates a simultaneous redox reaction in which the substrate glucose is oxidized at the same time as a colourless tetrazolium salt is reduced to a coloured formazan. The colour of the formazan depends on the tetrazolium salt used. Three common salts include:
i. Nitro blue tetrazolium (NBT) = blue reaction product
ii. Tetra nitro blue tetrazolium (TNBT) = brown reaction product
iii. Iodonitro tetrazolium (INT) = red/purple reaction product
β-galactosidase
This enzyme has molecular weight 500kDa and is isolated from Escherichia coli. Not commonly used for IHC, it employs the indigogenic histochemical method as highlighted in Figure 1.9.
Figure 1.9 The chemical reaction for β-galactosidase
For standard practice in diagnostic IHC, the two enzyme labels most commonly used are HRP and AP. Although other colours are available, the conventional pairing is DAB with HRP and Fast red with AP. Both pairings are counterstained with haematoxylin for routine optical light microscopy.
Conjugating Antibodies
When the early researchers first bound antibodies to antigens, the specific class of antibodies most often used were immunoglobulin G (IgG) molecules as depicted in Figure 1.3. These molecules have two variable regions specific for antigen binding as well as a constant region where labels can be attached. A quick and short single-step ‘direct approach’ as highlighted in Figure 1.10 was applied by Dr Coons when he conjugated the label FITC directly to antibodies for attachment to the antigens in his experiments. Using a fluorochrome in this instance, the label can vary with the most popular being an enzyme or metal particle such as colloidal gold. Radioisotopes have also been used.

Even though the direct approach is still in use today due to its simplicity, there are inherent practical shortcomings. The method is insensitive, producing low-signal yields, which necessitates the need for copious amounts of primary antibody to increase the signal-to-noise ratio. This workaround is not always possible, especially with epitopes that are naturally ‘low expressors’.
Later research revealed that antibodies could effectively act as ‘antigens’. This led to the discovery of secondary antibodies produced against the IgG of the species that made the primary antibody. Secondary antibodies are often produced in larger species offering plentiful sera. Using a two-step ‘indirect approach’ as highlighted in Figure 1.11, an unlabelled primary antibody reacting with the tissue antigen is applied first, followed by a labelled secondary antibody. The label conjugated to the secondary antibody indirectly locates the epitopes. A big advantage over the direct method is that multiple labelled secondary antibodies can bind with different antigenic sites on a single unlabelled primary antibody, which, in turn, increases the sensitivity of the assay. Another advantage is the ability to use the one labelled secondary antibody with many primary antibodies (clones) raised from the same animal species. Likewise, the secondary antibody can also be conjugated with fluorescent dyes (indirect fluorescence method) or enzymes (indirect immunoenzyme method).

Figure 1.11 Two-step ‘indirect’ immunolabelling
When researching the enzyme–antibody conjugation at the EM level, Dr Stratis Avrameas of the Pasteur Institute in Paris used glutaraldehyde to conjugate peroxidase to IgG. Using these conjugates, in 1971, he developed the enzyme immunoassay (EIA) and enzyme-linked immunosorbent assay (ELISA), both of which are ‘close relatives’ of IHC and widely used for clinical and research purposes.
While Professor Avrameas worked on enzyme immunoassays, Dr Paul Nakane, an assistant professor at the University of Michigan, also researched immunoenzyme techniques and successfully conjugated peroxidase to IgG with the bifunctional reagent p,p’-difluoro-m,m’-dinitrodiphenyl sulphone. Another challenge Dr Nakane undertook was exploring whether immunoenzyme techniques could be applied to the detection of multiple antigens in the same cells or tissues. We now call this endeavour ‘double IHC staining’ or ‘multiplex IHC’. He experimented with a sequential-type multiplex technique using indirect peroxidase labelling on rat pituitary tissue localizing luteinizing hormone, growth hormone and thyroid-stimulating hormone on the one tissue section (Reference NakaneNakane 1968). The method can be summarized as employing the indirect peroxidase technique several times with different primary antibodies each time to locate discrete epitopes and developing them with separate colours. Although primitive compared to today’s standards, using multiple sequences with various peroxidase substrates, he and his co-workers established that this could be done.
As a result of further developments in the late 1960s and 1970s to eliminate endogenous enzyme activity whilst maintaining tissue structure, the enzyme-based immunolabelling techniques proved superior to IF methodologies. Less (more diluted) primary antibodies could be used in detecting antigens. The labels did not fade and could be adopted for both the electron microscope and the standard optical brightfield microscopes.
Variations on the Theme
Even though enzyme-immunolabelling techniques were now preferred, there were practical problems still to be solved during the late 1960s to early 1970s. Most prominent was finding solutions to increase the efficiency of labelling and the ability to conjugate enzymes to all antibodies. Three prominent research groups emerged. They were headed by Dr Samuel Spicer from the Medical University of South Carolina, Dr Ludwig Sternberger, a professor at Johns Hopkins University, and Dr Stratis Avrameas of the Pasteur Institute in Paris.
Each team focused on finding suitable alternatives to the use of chemical conjugates for attaching enzymes. They found that anti-peroxidase antibodies can be used as a bridge to introduce the peroxidase enzyme to the assay. This new technology was coined the ‘immunoglobulin-enzyme bridge method’ by Dr Spicer, the ‘unlabelled antibody method’ by Dr Sternberger and the ‘mixed-antibody method’ by Dr Avrameas.
Each research group’s technique used indirect immunolabelling in a series of layers, the first layer being the unconjugated primary antibody followed by the second layer of the secondary antibody. The third layer is the anti-peroxidase antibody produced in the same species as the primary antibody. The fourth layer constitutes peroxidase enzyme, which is added to the assay in order to bind to the tertiary antibodies already present in the system. Finally, the fifth layer is added to the system containing the peroxidase substrate H2O2. Emphasized schematically in Figure 1.12, this IHC assay was known as the ‘sandwich approach’ and despite possessing a low-affinity anti-peroxidase-to-peroxidase bridge layer, the method was more sensitive and effective than any before it.

Figure 1.12 Immunoglobulin-enzyme bridge technique
In collaboration with Dr Howard Meyer, Dr Sternberger and co-workers added further refinement to develop the peroxidase anti-peroxidase (PAP) technique. In this assay, as highlighted in Figure 1.13, the third layer antibody to peroxidase is added as a complex with peroxidase enzyme. Compared to the similar immunoglobulin-enzyme bridge technique shown in Figure 1.12, this strategy required fewer steps and also allowed more peroxidase enzyme into the assay, thus increasing sensitivity. With the enzyme being immunologically bound rather than chemically conjugated, the PAP complex was very stable and allowed higher dilutions of primary antibody within IHC assays. It was estimated to boost the label’s efficiency between 100 and 1,000 times (Reference Sternberger, Hardy, Cuculis and MeyerSternberger et al. 1970). Other workers successfully adapted this new-found PAP technique to immuno-electron microscopy applications. Reference Moriarty, Moriarty and SternbergerMoriarty and colleagues (1973) found it more sensitive than radioimmunoassays when working on the hormone adrenocorticotropin.

Figure 1.13 Peroxidase anti-peroxidase (PAP) technique
Colloidal Gold Immunolabelling
The PAP technique seemed a popular choice for immuno-electron microscopy in the early to middle 1970s. Regardless, further improvements were sought, the most promising being the use of colloidal gold as an immunocytochemical label developed by Dr Ward Page Faulk at the University College of North Wales and Malcolm Taylor at the Charles Salt Research Centre in Shropshire in 1971 (Reference Faulk and TaylorFaulk and Taylor 1971). In 1978, Dr Jurgen Roth, Dr Moise Bendayan and Dr Lelio Orci developed protein A-coated colloidal gold which acquired more specific absorption properties (Reference Roth, Bendayan and OrciRoth et al. 1978). Figure 1.14 shows an example of Dr Jurgen Roth’s protein A-coated colloidal immunogold technique employed to pinpoint the glucosyltransferase enzyme as black electron dense particles (arrows).

Figure 1.14 Immunogold labelling for glucosyltransferase in the rough endoplasmic reticulum of rat liver hepatocyte. Ultrathin frozen section, protein A-gold technique.
Another example of an indirect antibody technique, colloidal gold can be attached to the secondary antibody for binding with the primary antibody as illustrated in Figure 1.15. In this instance, the ‘label’ is colloidal gold particles instead of a fluorochrome or enzyme.

Figure 1.15 Colloidal gold attached to secondary antibody for binding with primary antibody
Another avenue for gold conjugation is employing protein A obtained from Staphylococcus spp to react with protein G within the constant region of an antibody. As perfect as it was for ultrathin sections observable as electron dense spots shown in Figure 1.14, the colloidal gold particles used in the 1970s were large and did not penetrate tissue well, labelling only surface antigens on sections. Later years saw the development of smaller gold particles and the use of silver to enhance the label.
Electron microscopy, particularly transmission electron microscopy (TEM), is utilized in highly specialized disciplines of anatomical pathology. More popular in the late twentieth century than it is nowadays, TEM is reserved for specialized investigations of renal, muscle and nerve diseases. Unfortunately, its use is not widespread in routine diagnostic laboratories. The high costs for maintenance and requirement of highly skilled workers to not only operate the machine, but also prepare ultrathin sections has seen TEM units slowly disappear from hospital facilities to find refuge in specific university departments where they also fulfil various research endeavours. As such, the skills attained from immuno-electron microscopy may one day be lost to but a few fortunate scientists.
Correcting Inconsistencies
As the IHC technique improved with each new discovery, there were still practical limitations to overcome. Chiefly among these problems were erroneous results achieved from unreliable protocols. The high probability of unintentional washing away of the antibody–antigen reactants from tissue during the assay rendered the methods inconsistent.
Determined to resolve these issues, in the early 1980s, Dr Su-Ming Hsu of the Department of Pathology at Rhode Island Hospital and Brown University experimented with avidin. It is a large glycoprotein molecule that has high affinity with biotin, otherwise known as vitamin H. He conjugated biotin to an antibody and linked the peroxidase enzyme to avidin, resulting in an avidin-biotin-antibody-peroxidase complex to the IHC assay. This new avidin-biotin-peroxidase complex (ABC) highlighted in Figure 1.16 develops relatively fast to label the antigen within two hours. Development of the enzyme with DAB then followed in the usual manner to produce the brown-coloured end product. This new technique had several other advantages. The complex was quite robust, able to withstand extremes in temperature, pH fluctuations, exposure to denaturing agents and resistant to enzymatic degradation. Most impressive was the ability to utilize the ABC method to an unlimited number of primary antibodies. The downside is that there are naturally occurring endogenous biotin within tissue that must be blocked. Otherwise, results could be tainted with false positive staining.

Figure 1.16 Avidin-biotin-peroxidase (ABC) complex
Further refinement of the ABC technique centred around the avidin molecule. ‘Strepavidin’, isolated from the bacterium Streptomyces avidinii, allowed the formation of a labelled streptavidin-biotin-enzyme conjugate (LSAB) at the neutral pH of reagents used for IHC assays. The theory is identical to the ABC method, based primarily on biotin having a strong affinity with streptavidin. The same first layer of unlabelled primary antibody is followed by a second layer of biotinylated secondary antibody. The third layer now is an enzyme–streptavidin conjugate in the LSAB technique as shown in Figure 1.17. The technique lends itself to any enzyme label the investigator chooses for chromogenic development and can also be conjugated to a fluorescent dye such as FITC. The main advantage, however, is the higher sensitivity afforded to the IHC assay due to the LSAB complex being much smaller than the ABC compound. Detecting 5 to 10 times more biotinylated antibody on the tissue section when compared to the ABC method results in a ‘brighter’ signal.

Figure 1.17 Streptavidin-biotin-peroxidase (LSAB) technique
The Modern Era
With such a rich history and many contributors through the years, the question of when exactly the practice of IHC came into the modern era is hard to define and is arguably debatable. The proposal here is that IHC became a ‘legitimate’ histological technique with the advent of epitope retrieval systems. Even though retrieval methodologies appeared at least 30 years ago, the most profound impact it had on anatomical pathology was that it took IHC practice mainstream and made it available to any histology facility. The ability to unmask antigens allowed the traditional foundations of histologic technique in the form of FFPE sections to continue, thereby keeping relevant the fundamentals of morphological assessments with H&E staining. In short, this new IHC technology was able to work with existing histology practices, which made it a powerful analytic tool. However, the biggest challenge posed with IHC technology in this modern era was the recognition for IHC practices to follow a standardized stream (Reference Taylor, Shi, Barr and DabbsTaylor et al. 2010). With so many variables, the consensus was a need for a ‘controlled’ assay, and the biggest leap was identifying all the parameters into pre-analytic, analytic and post-analytic groups. Chapter 2 continues this standardization theme for IHC within the context of quality assurance.
Unmasking Antigens
In 1893, Dr Ferdinand Blum (Figure 1.18) was approached by the chemical manufacturing company Meister, Lucius and Brunig at Hoechst am Main in Germany to test the antiseptic properties of formaldehyde. In addition to its germ-killing properties, he soon discovered the superiority of the chemical as a tissue fixative when compared to alcohols. In its natural state, formaldehyde is a gas and can be dissolved in water as a 37–40% concentrated solution. For tissue fixation purposes, it is diluted to a 10% working solution containing 3.7–4% formaldehyde, commonly referred to as 10% formalin. This diluted solution has, along with paraffin embedding, become the standard method of tissue preservation in anatomical pathology and is still in use today.

Formalin fixation preserves tissue morphology rather well, highlighted with appropriate staining essential for diagnoses such as the H&E stain. Its mode of action is to form protein cross links in reactive sites via methylene bridges. In doing so, antigenic sites within tissue and their epitopes are altered, effectively masking them from antibodies. These changes lead to a reduction or loss of immunoreactivity of target antigens in formalin-fixed tissue, thereby restricting antigen–antibody binding and limiting their detection. This phenomenon is detrimental for IHC detection, especially with the use of monoclonal antibodies, which recognizes only one epitope.
In 1988, when examining whether the formalin-fixation-induced changes could be reversed and the structure of proteins restored, Dr SR Shi at the University of Southern California discovered formalin protein cross-linking could be disrupted and the epitopes unmasked by placing the FFPE sections into boiling water (Reference Shi, Cote and TaylorShi et al. 2001). The use of heat above 100°C for 10–40 min led to further refinements of heat-induced epitope retrieval (HIER) methods using buffers based on citrate, EDTA or Tris saline (Reference Shi, Cote and TaylorShi et al 1997). Restoration of the antigenic epitopes to their original formation allows antigenic sites to be exposed for antibodies to bind to them. There is a plethora of heating methods utilized for HIER ranging from simple boiling, pressure cooking and microwave irradiation to specialized heating pads. All are suitable, but the main concern is that the distribution of heat energy must be uniform across the entire tissue section and that the heating process is reproducible and consistent day after day.
More experiments focused on breaking up the formalin-protein-methylene bridges revealed a second method for unmasking antigens. Proteolytic-induced epitope retrieval (PIER) uses protease enzymes such as proteinase K, trypsin and pepsin to split the peptides that are believed to mask the epitope (Reference Roth, Ziak, Guhl, Shi, Gu and TaylorRoth et al. 2000). These enzymes are useful for epitopes which are heat labile and relatively fast acting, but prolonged enzyme digestion incubations may also destroy tissue morphology and epitopes under investigation. The optimal digestion conditions are found by the investigator through trial and error.
The success of the LSAB technique coupled with proven antigen retrieval methods for immunolabelling tissues in both clinical and research situations led to dramatic increases in IHC assays reflected in the vast number of journal publications submitted for peer review. Immunohistochemistry techniques were utilized in many specialties such as molecular biology, surgical pathology, immunology, histology, microbiology and oncology, both in research and in diagnostics. Immunohistochemistry has found a niche in clinical diagnostic endeavours, routinely employed alongside traditional histology stains to answer complex clinical situations.
More refinement to IHC protocols were to be unveiled, coming from the need for greater sensitivities, recognition for assay standardizations and discovery of an ever-expanding list of primary antibodies. Seeking methods to accommodate primary antibodies from different species, alternative labels other than peroxidase enzyme and secondary antibodies to cover IgGs from a wide range of species were the objectives. Ongoing research led to two discoveries that caused great change to the IHC assay in the form of polymer technology and automated staining instruments.
Polymer-Based Detection Systems
The more enzyme label molecules recruited to a localized area, the more sensitivity and improved signal intensity is achieved with the IHC assay. One inspiration uses an inert dextran polymer as a backbone with a large number of antibodies attached and bound to many enzyme molecules. A schematic is highlighted in Figure 1.19 showing the attraction between the rabbit primary antibody and the anti-rabbit antibodies attached to a polymer backbone. Notice the high number of peroxidase enzyme molecules (green circles) attached to the polymer localized in the immediate area, which means a more intense signal development with DAB. Some polymer kits include a ‘linker’ secondary antibody specific for the primary antibody species of origin. For example, a secondary linker antibody could be of rabbit origin, binding to a mouse primary antibody and then itself being detected by anti-rabbit antibodies on the polymer strand. In this example, there are in fact three layers within the IHC system whereas Figure 1.19 shows a two-layer polymer IHC assay.

Figure 1.19 Polymer-based detection method
Other workers have taken the technology to employ an enhanced polymer one-step (EPOS) IHC protocol (Reference Tsutsumi, Serizawa and KawaiTsutsumi et al. 1995). Although suitable for rapid IHC assays, it has not found widespread use in diagnostic settings. The main drawback is that each primary antibody must be conjugated to polymer, a practice which is not feasible for a busy IHC facility offering up to 100-plus antibodies.
Regardless, the number of layers in the IHC assay is not important; what matters most is the number of enzymes available to drive the chromogen reaction. Others have found suitable alternatives to this polymer technology. Roche Ventana maximizes enzyme labels within the IHC assay by employing haptens and multimer technology, explained further in Chapter 4. Current-generation IHC detection technology is readily available from many IHC vendors. For ease of use, they are packaged as kits for manual applications or marketed to match proprietary automation platforms. Each detection kit contains the necessary reagents for the IHC assay excluding the primary antibody. A closer inspection of Leica, Roche and Agilent detections kits is provided in subsequent chapters of this book.
The enlistment of polymer technology and its equivalent possesses many advantages over earlier superseded methodologies. The protocols are easier to standardize, the assay is completed in two to three hours, unwanted background staining is minimized, and the one kit works with both mouse and rabbit primary antibodies. In addition, they allow workers to perform high-quality multiplex assays consistently. Figure 1.20 shows both single and double IHC staining typically produced in diagnostic IHC facilities today.

Figure 1.20 Single and dual chromogen immunohistochemistry
In addition to single and double immunolabelling, IHC can also be combined with special histological stains and in situ hybridization (ISH) assays. Polymer technology is flexible, specific and sensitive to be deployed in specific clinical situations such as investigating kidney tubulitis, coeliac disease and lymphoma.
Tubulitis is a key histological feature of rejection in kidney transplants and is severely under-detected by conventional H&E microscopy. Although IHC can clearly indicate CD3 positive T-cells in tissue, it is difficult to judge the exact location in reference to the tubular basement membrane. The periodic acid Schiff (PAS) reaction stains tubular basement membranes a magenta colour but cannot reveal T-cell location. Combining the CD3 IHC stain with a PAS on the one tissue section is a useful diagnostic tool to avoid misdiagnosing rejection. Figure 1.21 shows the exact location of a CD3-positive T-cell located within a tubule indicating tubulitis and therefore transplant rejection.

Figure 1.21 CD3-positive lymphocyte (arrow) present inside tubule indicating tubulitis
The same assay can also assist the screening of coeliac disease, an autoimmune disorder of the gastrointestinal tract characterized by chronic inflammation of intestinal mucosa. A diagnostic hallmark is observing increased T-cell numbers in the epithelium lining the small bowel. They are the culprits involved in initiating, maintaining and controlling this chronic inflammation. T-cell populations are often difficult to see in conventional microscopy because of the disruption to the intestinal morphology at these sites. As shown in Figure 1.22, IHC staining highlights CD3-positive T-cells and the PAS reaction shows the epithelial basement membrane so that the pathologist can ascertain the exact location of the CD3 positive T-cells. If found in the submucosa, all is normal, but if seen within the luminal epithelium next to glandular structures, this indicates coeliac disease.

Figure 1.22 Presence of CD3 inside epithelium lining of small bowel
An example of combining IHC with ISH is found in a specific lymphoma workup complicit with Epstein–Barr virus (EBV). More than 90% of adults have been infected with EBV, most commonly in B-cells within the tonsils. Epstein–Barr virus is, however, also associated with non-B-cell tumours. When present in T-cell proliferative disorders of childhood, the resulting liver failure and intravascular coagulation may lead to death, so a quick diagnosis is required. Analysis is based on the clonal proliferation of EBV-positive T-cells in liver, lymph nodes and bone marrow. This clonal proliferation can be illustrated via sequential multi-staining to test for EBER ISH and CD3-double-positive cells shown in Figure 1.23 (A). Compare this to a sequential multi-stain of EBER ISH and CD20, a B-cell marker in Figure 1.23 (B).

Figure 1.23 (A and B): EBER-ISH (brown) and CD3 and CD20 (red) combinations
Automation
Mirroring the evolution of the IHC assay, the story of robotics for IHC applications also began from humble beginnings as simple fluid transfer vehicles to the sophisticated all-in-one systems available today. The arrival of automated staining instruments such as Leica’s Bond-III, Roche’s BenchMark ULTRA and Agilent’s Omnis shown in Figure 1.24 has been met with great enthusiasm by anatomical pathology laboratories and researchers worldwide. The reasons why and a discussion on each individual vendor’s design, attributes and technology are provided in the robotics and automation chapters of this book.

Figure 1.24 Common immunhistochemistry automation platforms (not to scale).
Principally, automation is an improvement over manual staining because it eliminates inter-worker variations and promotes standardized protocols in IHC. Other advantages include:
Multiple antigen labelling can be performed sequentially using a brown DAB chromogen kit followed by a red alkaline phosphatase kit, or in parallel using a single kit containing both the brown DAB and red alkaline phosphatase chromogens.
Immunohistochemistry can be combined with in situ hybridization (ISH), thus giving information about a particular target both at the protein level and at the DNA/mRNA level.
Barcode tracking prevents the selection of incorrect reagents and alerts the operator about insufficient reagent volumes.
Computerized software assists with reagent inventory, keeping track of reagent stock and dates of expiry.
Inbuilt alarms warn about errors such as incorrect temperatures and calibration errors.
It is less time-consuming for the technologists who are free to complete other duties.
However, as much as automation has advanced
IHC, it does have its drawbacks:
For IHC staining to be optimal, like all machines, these instruments need regular maintenance.
All breakdowns, whether a blown 50-cent fuse or full module failure, must be attended by qualified service personnel. Any downtime leads to interruption in workflow.
Vendors ‘lock’ their systems to insist on the use of their own proprietary reagents.
The ability to tweak an IHC assay is limited to one or two parameters.
Due to the ‘plug and play’ nature of automation, technologists run the risk of being less knowledgeable about the IHC assay and therefore less able to troubleshoot problems.
Companies may decide to stop supporting a particular model, forcing laboratories to upgrade systems.
Therefore, to get the most out of any IHC platform, the user must be well informed about the science of IHC so that the instrument is used to its full potential. Vendor support applications specialists can only assist in this regard to a certain extent. Optimizing protocols, choosing the appropriate antibody clone and selecting control materials still rests with laboratory staff tasked with providing a reliable IHC service.
The Immunohistochemistry Technique
Thus far, important IHC concepts discussed include references to immunology, histology and chemistry. The various labels acquired and the processes involved to detect them have also been mentioned. Likewise, technologies invented to increase sensitivity and standardization efforts have also been raised. To complete this discussion on the fundamentals of the IHC assay, a closer review is now applied to the primary antibody, control material and the actual IHC protocol.
Choosing the Primary Antibody
Much of the success in IHC staining depends on primary antibodies specifically binding to the target antigen. Therefore, the decision as to the clone, type and class of antibody deployed for staining is an important one. Not all antibodies are created equal, so the IHC technologist will have to spend time researching the literature to choose the most appropriate one for a particular application. Decisions must be made as to whether the protocol will involve direct or indirect methods, the type of label used and the development of the chromogen.
One important factor to consider is the characteristics of the antibody and the species it was derived from. Polyclonal antibodies are attained from immunized animals, giving rise to antibodies produced from different B-cells that have the ability to recognize numerous epitopes of the same antigen. They are renowned for high sensitivity but can be subject to poor specificity. Monoclonal antibodies obtained from hybridomas offer antibodies produced from identical B-cells taken from a parent clone. These antibodies are made to detect only one epitope of the antigen. Conversely, monoclonals have high specificity but may suffer from low sensitivity. Whatever the decision, each antibody needs to be optimized against the staining system used in the IHC laboratory to ensure it is best suited for use.
Primary antibodies have been traditionally available in the concentrated form requiring optimization before use in IHC laboratories. These days, many primary antibodies are also offered as ready-to-use (RTU) predilutes. Each has its advantages and disadvantages. The choice is made by individual laboratory preferences taking into account cost, vendor reputation, consistency of performance, shelf life and ease of use. Some manufacturers also include antibodies conjugated with labels for specific requirements.
Concentrates are adaptable, able to be used in a range of optimal working dilutions in most staining systems, manual or automated. However, time is needed for preparation, optimization and validation. Dilutions made manually could vary from person to person, giving inconsistencies in staining. There is a greater margin for human error. Also, if the expiry date of the concentrate is approaching, the staining quality may deteriorate.
The RTUs are prepared, optimized and validated for use by manufacturers. There is often a stipulation of the parameters required and they are most often tuned for the vendors proprietary IHC platforms. Having one less variable to worry about frees up time for the technologist to better manage reagent and quality control and thus improve laboratory workflow. Elimination of errors via manual dilutions may mean consistent optimal results if all other staining variables are optimal. Unfortunately, these advantages do come at an overall increased cost of the RTU antibodies. However, the most important aspect of RTU antibodies is the prerequisite that pre-analytical parameters such as tissue fixation and processing must have been performed to an acceptable ‘standard’ and that this standardization of conditions has to be consistently achieved. Otherwise, the IHC assay will produce variable results.
Selecting Appropriate Controls
Because variables such as incubation time, incubation temperature, buffer pH and antibody dilutions can adversely affect IHC staining, standard practice mandates that each IHC run includes positive controls known to express the antigen of interest and negative controls from tissue known not to express the antigen. The use of both positive and negative controls corroborates the results of the test tissue. Chapter 2 dives further into this topic in the overall discussion about quality assurance in IHC.
General Staining Protocol
Taking all the topics that have been discussed and bringing them all together, they can now be summarized into an IHC staining protocol. Generally, the IHC procedure can be grouped into various stages. For FFPE, after baking and dewax, antigens are retrieved first, before application of a primary antibody. If labelling with peroxidase, a blocking step is required to quench endogenous peroxidase activity. The next stage is detection and chromogen development before counterstain and mounting with a coverslip. A summary is provided in Appendix 1 showing the steps of a typical IHC assay using polymer detection with peroxidase as the label and DAB as the chromogen.
In reality, there are many possible variations to this template protocol because IHC is utilized in many scenarios and under numerous situations. Underlying questions include:
Are the test tissue and animal sera compatible?
Is the nature of the test tissue fresh, frozen or FFPE?
Is the label enzymatic or fluorescent?
Is the detection system avidin-biotin or polymer based?
Are additional blocking steps required depending on the type of reagents used?
Even though there are many scenarios with their own intricacies, the essentials remain the same. Thus the core requirements for any IHC protocol include:
Knowing the nature of the test tissue section
Ascertaining the animal species that produced the primary antibody
Requirements for a blocking step or a number of different blocking strategies
A suitable detection system for the chosen label
Development and visualization of the label
Suitable counterstain to contrast with the label
Mounting and coverslip for permanent storage
Breaking down the IHC assay systematically and addressing each parameter will make the process more manageable. Chapter 6 discusses this in more detail when tailoring IHC to research applications. Obtaining a suitable antibody clone is just the first step in a series of considerations necessary for IHC success.
Conclusion
When IHC is stripped down to basic fundamentals, three categories emerge. Immunohistochemistry borrows concepts from immunology, histology and chemistry. At its core are antibodies employed to tag antigens within a morphological index and to visualize these reactions with chemistry principles. The development of IHC started in the late 1800s and continues to evolve. There are numerous contributors to IHC technology, each one building on the success of their peers. Important discoveries include the realization that antibodies are immunoglobulin proteins and the ability to conjugate them with labels. Then came improved consistencies with the invention of epitope retrieval methods and polymer detection systems. Biomedical engineering marvels brought automation to IHC and the important notion of standardization in IHC assays was realized. Finally, as more protocols were used to determine patient prognosis and therapies, important quality assurance matters needed to be addressed. All of these themes are explored further in this book.
It is hoped that this chapter has served as an introduction to IHC principles and the people credited for its discovery and development. It is such an important tool in research applications and diagnostic endeavours that clinicians, scientists, laboratory staff and managers all need to understand its fundamentals before exploiting its wonders.