Hostname: page-component-745bb68f8f-d8cs5 Total loading time: 0 Render date: 2025-01-27T14:01:33.875Z Has data issue: false hasContentIssue false

An energy-based nanoindentation method to assess localized residual stresses and mechanical properties on shot-peened materials

Published online by Cambridge University Press:  06 March 2019

Siavash Ghanbari
Affiliation:
School of Materials Engineering, Purdue University, West Lafayette, Indiana 47906, USA
David F. Bahr*
Affiliation:
School of Materials Engineering, Purdue University, West Lafayette, Indiana 47906, USA
*
a)Address all correspondence to this author. e-mail: [email protected]
Get access

Abstract

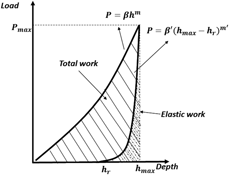
Concurrently assessing localized residual stresses and mechanical properties in cases where there are gradients in stresses and properties (such as those resulting in metallic alloys from shot peening processes) is challenging. Most indentation-based stress measurements assume uniform properties, which is not necessarily the case in this common industrial process. By using the energy envelope describing the total work of indentation by a load–displacement curve from instrumented indentation, localized residual stresses after shot peening were evaluated experimentally. A framework is developed to describe the appropriate indentation depth at which to assess properties that effectively define the volumetric resolution of the method. The residual stresses predicted via the nanoindentation experiment and energy analysis were validated with X-ray measurement of residual stresses on a shot-peened 52100 steel. The energy method can be applied directly from the indentation load–displacement curve without considering the contact area.

Type
Article
Copyright
Copyright © Materials Research Society 2019 

Access options

Get access to the full version of this content by using one of the access options below. (Log in options will check for institutional or personal access. Content may require purchase if you do not have access.)

References

König, G.W.: Life Enhancement of Aero Engine Components by Shot Peening Opportunities and Risks, 3rd ed. (Wiley-VCH, Weinheim, Germany, 2003); p. 13.Google Scholar
Seifi, R. and Majd, D.S.: Effects of plasticity on residual stresses measurement by hole drilling method. Mech. Mater. 53, 73 (2012).CrossRefGoogle Scholar
Mahmoodi, M., Sedighi, M., and Tanner, D.: Investigation of through thickness residual stress distribution in equal channel angular rolled Al 5083 alloy by layer removal technique and X-ray diffraction. Mater. Des. 40, 516 (2012).CrossRefGoogle Scholar
Suresh, S. and Giannakapulos, A.E.: A new method for estimating residual stresses by instrumented sharp indentation. Acta Mater. 46, 5755 (1998).CrossRefGoogle Scholar
Tsui, T.Y., Oliver, W.C., and Pharr, G.M.: Influence of stress on the measurement of mechanical properties using nanoindentation: Part I. Experimental studies in a aluminum alloy. J. Mater. Res. 11, 752 (1995).CrossRefGoogle Scholar
Meng, Q.N., Wen, M., Hu, C.Q., Wang, S.M., Zhang, K., Lian, J.S., and Zheng, W.: Influence of the residual stress on the nanoindentation-evaluated hardness for zirconium nitride films. Surf. Coat. Technol. 206, 3250 (2012).CrossRefGoogle Scholar
Bolshakov, A., Oliver, W.C., and Pharr, G.M.: Influences of stress on the measurement of mechanical properties using nanoindentation II. Finite element simulations. J. Mater. Res. 11, 760 (1996).CrossRefGoogle Scholar
, Z.H. and Li, X.: Influence of equi-biaxial residual stress on unloading behaviour of nanoindentation. Acta Mater. 53, 1913 (2005).CrossRefGoogle Scholar
Khan, M.K., Fitzpatrick, M., Hanisworth, S.V., and Edwards, L.: Effect of residual stress on the nanoindentation response of aerospace aluminum alloys. Comput. Mater. Sci. 50, 2967 (2011).CrossRefGoogle Scholar
Zhu, L., Xu, B., Wang, H.D., and Wang, C.: Measurement of mechanical properties of 1045 steel with significant pile-up by sharp indentation. J. Mater. Sci. 46, 83 (2011).CrossRefGoogle Scholar
Mann, P., Miao, H.Y., Garepy, A., Levesque, M., and Chromik, R.R.: Residual stress near single shot peening impingments determined by nanoindentation and numerical simulations. J. Mater. Sci. 50, 2284 (2015).CrossRefGoogle Scholar
Carlsson, S. and Larsson, P.: On the determination of residual stress and strain fields by sharp indentation testing theoretical and numerical analysis. Acta Mater. 49, 2179 (2001).CrossRefGoogle Scholar
Swadener, J.G., Taljat, B., and Pharr, G.M.: Measurement of residual stress by load and depth sensing indentation with spherical indenters. J. Mater. Res. 16, 2091 (2001).CrossRefGoogle Scholar
Wang, Q., Ozaki, A.K., Ishikavawa, B.H., Nakano, S., and Ogiso, H.: Indentation method to measure the residual stress induced. Nucl. Instrum. Methods 242, 8892 (2006).CrossRefGoogle Scholar
Oliver, W. and Pharr, G.: Measurement of hardness and elastic modulus by instrument indentation: Advances in understanding and refinements to methodology. J. Mater. Res. 3, 12 (2004).Google Scholar
Zhu, L., Xu, B., Wng, D., and Wang, B.: Effect of residual stress on the nanoindentation response of (100) copper single crystal. Mater. Chem. Phys. 136, 561 (2012).CrossRefGoogle Scholar
Pharr, G. and Bolshakov, A.: Understanding nanoindentation unloading curves. J. Mater. Res. 17, 2660 (2002).CrossRefGoogle Scholar
Shrshorov, M., Bulychev, S.I., and Alekhin, V.O.: Work of plastic and elastic deformation during indenter indentation. Sov. Phys. Dokl. 26, 769771 (1981).Google Scholar
Hainsworth, S.V., Chandler, H.W., and Page, T.F.: Analysis of nanoindentation load–displacement loading curves. J. Mater. Res. 11, 8 (1996).CrossRefGoogle Scholar
Chaudhri, M.M.: Subsurface strain distribution around Vickers. Acta Mater. 46, 3047 (1998).CrossRefGoogle Scholar
Tabor, D.: The Hardness of Solid (Oxford University Press, Oxford, England, 1951).Google Scholar
Nix, W.D. and Gao, H.: Indentation size effects in crystaline materials a low for strain gradient plasticity. J. Mech. Phys. Solids 46, 411425 (1998).CrossRefGoogle Scholar
Wolf, B. and Richter, A.: The concept of differential hardness in depth sensing. New J. Phys. 5, 215 (2003).CrossRefGoogle Scholar
Wolf, B., Richter, A., and Gunther, M.: Approaches of quantifying the entire load–depth curve in terms of hardness. Z. Met. 94, 807812 (2003).Google Scholar
Rydin, A. and Larsson, P.: On the correlation between residual stresses and global indentation quantities equibiaxial stress field. Tribol. Lett. 31, 42 (2012).Google Scholar
Oliver, W.C. and Pharr, G.M.: Influences of stress on the measurement of mechanical properties using nanoindentation: Part I. Experimental studies in an aluminum alloy. J. Mater. Res. 11, 752 (1996).Google Scholar
Youkendou, K.: X-ray stress measurement method. Japan Soc. Mater. Sci. 54, 225 (1981).Google Scholar
Yoshioka, Y., Ohya, S., and Shinkai, T.: Influence of image processing conditions of debye. J. JSNDI. 39, 666 (1990).Google Scholar
Sasaki, T. and Hirose, Y.: Influence of image processing conditions of debye scherrer ring images in X-ray stress measurement using an imaging plate. JCPDS-International Centre for Diffraction Data 2, 1254 (1997).Google Scholar
Taira, S. and Tanaka, K.: Local residual stress near fatigue crack tip. Soc. Mater. Sci. 27, 251 (1978).CrossRefGoogle Scholar